Sunday, August 31, 2008

Create a gift from your heart....

Our pastor's wife had a baby recently and I wanted to send a little gift to welcome their new bundle of joy. It was their first child. I remember how many photos I took, just in the first month. What could be better than a special book to hold all those memories of their little angel. Making things for little girls is my speciality. Being that I have two boys I rarely get the opportunity to make girly things. I went to my "stash" and got out the fancy ribbon, rhinestones and flowers. You know I love pink...so the theme had to be girly PINK!
A ribbon closure and pink buttons and embellishments adorned the inside. Empty pages just waiting to be filled with photographs of their blessing sent from above.
I made a matching gift bag and gift tag to hold to hold the special gift.
Next time you need a gift try creating it yourself. It will be a gift that will touch someones heart.
Even before the stars lit up the sky, you had a special place in the heart of God.

Thursday, August 28, 2008

Precious Memories Tucked away....

When people ask me what I create, I'm really never sure how to describe it or what to call it. Some people call themselves an "artist". I can't draw, not even a stick figure. If you would like to suggest a name for it, please let me know. For now I will refer to it as my "paper creations". I came up with this idea for a gift when my son was 16. Over the course of that school year, he had been invited to about 15 Sweet Sixteen parties. This can get expensive, so I starting thinking of what I could make for a gift that a 16 year old girl would enjoy.... I picked up a photo album (5"x7") at Michaels Craft for $2.49 less my 40% off coupon. With a few sheets of scrapbooking paper and some embellishments that I had in my stash, I created this inexpensive gift. There are many pages for the girls to store their photos and souvenirs.
I made a matching gift bag and gift tag to put this little treasure in. What young girl wouldn't want a book to store all their keepsakes in.

The inside page has this bible verse :

“For we are God’s workmanship, created in Christ Jesus to do good works, which God prepared in advance for us to do.” Ephesians 2:10

I love this verse. It reminds me that I was created by God and he had a plan for me and for you even before we were born. I thought it was a wonderful verse to put in this birthday gift.

Throughout our life we gather memories. They come in different forms. There are the memories we cherish in our minds, cards we have collected over the years, little love notes we tuck away and precious photos that capture a special time or event. Take the time to make yourself a "paper creation" that will afford you the opportunity to gather up these special memories and display them and share the memories with others.

Memory is a way holding onto the things you love, The things you are, the things you never want to lose.

Tuesday, August 26, 2008

Pearls make every outfit look vintage...

This summer I signed up for a vintage apron swap through Garb-oodies. I was on a mission today to finish the apron. I waited with anticipation a few weeks ago to get the email letting me know who my partner was. Once I received the information I realized that my partner was the person who was hosting the swap. Now the pressure was on! The requirements were that the apron had to have a vintage theme. I used the pattern Butterick #4145 to make the apron. All I knew about my partner was she liked the color red and liked to mix patterns. I found a fabric that I thought had a vintage look to it. A small mini print of red and white was used for the contrast. I felt the pearls added a vintage look to the outfit. You can't wear an apron without accessorising the outfit with pearls. That is so June Cleaver!!!
The pockets were trimmed in an aqua calico print. I added a vintage batten burg doily that I gathered up and embellished with a Yo-Yo.
Just a few extra goodies were added to the package. A vintage dishcloth that I trimmed in the apron fabrics and a little pocket book to carry coupons or receipts in your purse. My good friend Amy from Homeacre shared this pattern with me.

I love the creative aspect of sewing. Having a vision in your mind and with a needle and thread your vision comes to life. I hope this inspires you to use the gifts you have been given to create something to treasure.

"I dream my paintings, then I paint them". Vincent Van Gogh

Monday, August 25, 2008

My baby is a senior....

Well last night after everyone was tucked into bed I snuck downstairs and had to get the decorations going. My oldest son Brandon is returning to high school today. It's just not ANY first day of school, it's his first day as a SENIOR in high school. I couldn't let the day begin without some festivities. I went into the storage room and got out the balloons and ribbons and decorated the kitchen in the school colors. I was hoping he wouldn't come down for a midnight snack and spoil the surprise. I waited patiently for the alarm to ring this morning.
After three attempts to wake him, he finally came down for breakfast. I'm not sure how he will be able to get himself up when he's off at college next year! As he bounded from the staircase into the kitchen his eyes twinkled with delight. He was surprised to see the festive greeting that reminded him that he was now "the top dog" at the school. I couldn't let the moment pass without a click of the camera to savor the moment. Another memory to tuck away and be reminded how qucikly time has passed by....
After he drove off to leave for what will be his last year at home, my husband and I held hands and prayed for him and all the plans God has in store for him. We have officially begun the school year routine! Summer is coming to a close and this saddens me, but there are so many wonderful times to look forward to throughout this school year.

“Train up a child in the way he should go, even when he is old he shall not depart from it.” Proverbs 31:28

Sunday, August 24, 2008

Today was bargin Day!

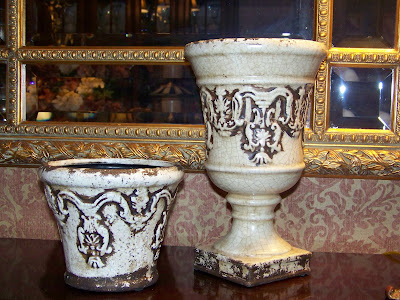
Isn't it a great feeling when you walk into a store and see a sign stating "Clearance 80% off". Today I hit the jackpot. I only had a few minutes to run into Michaels Craft store to purchase some beads for an apron project that is in the works. The last of the clearance items had just been marked down and I couldn't pass up the bargains. I'm not sure where they will end up in my home, but the price was right and I couldn't pass up the bargin! I got each of these containers for $3.84. I think I am going to make two topiaries for my kitchen window. I'll post the completed project later when I finish them.
These two containers started off at $24.99 each. Originally that was out of my price range. The clearance price was $4.99 each. I snatched them up. The color was not right but with a little black paint they will be perfect color. What to do with them, I'm not sure yet....but I know they will be perfect for something!
Here's another bargain $3.89. I don't even have to paint this one.

Last but not least.... another rooster. Didn't I mention that you can't have to many roosters! At $1.79 I couldn't leave this one behind. All in all I think I did pretty good. My trip was well worth it.

Today was a beautiful day. I hope this Sunday you were able to enjoy the day and the sunshine that He created with you in mind to enjoy.

"He has made everything beautiful in its time." Ecclesiates 3:11

Thursday, August 21, 2008

A wreath has a way of saying welcome to guests...

Here's something else you will learn about me. I LOVE summer. It's my favorite time of year. I start thinking about it right after the first snow fall. In Michigan that could be as early as October! I dislike the winter months. For me after Christmas there is nothing to look forward to until the trees begin to bud. I do not like the cold. The hotter the better. I love the look of a wreath on a front door. It has a way of welcoming your guests. I always have a handmade wreath which I have made, hanging on the front door. I change them out for the season. Making wreaths is something I enjoy. I have taught some classes in designing floral wreaths. This is one of my favorite wreaths for my door. Why is it my favorite? Because it's Pink and it's my summer wreath.

So when spring approaches, I am out at the greenhouse buying and planting lots of flowers. Lots and lots of PINK flowers. I planted 22 flats, that's 1056 individual cells of impatiens. The impatiens were hot pink, light pink and coral pink. I also added hanging baskets and pots of flowers. I always plant the same type of flowers and the same colors. I never get tired of them. Why would you get tired of pink!

I had seen this type of basket with an iron wall grate in the Ballards catalog. It was all one piece and it was $149.00. I went to Joann fabrics and got the iron wall basket with the liner for $16.99 and I purchased the wall grate at a home discount store for $25.00. It was a bargain. So for a total of $42.00 I got the exact look I saw in the catalog. I love when that happens. It is two separate pieces, but that is even better. In the winter I can take the basket off when it's cold and I can't enjoy having flowers.

I also have a thing for bunnies. Only in the garden! This little bunny greets my guests as they arrive at my front door. I like how it looks as if he is just standing in a garden of beautiful flowers.

I think flowers are such a thing of beauty. One of God's wonderful creations that puts a smile on my face whenever I see them.

"they will be like a well watered garden, and they will sorrow no more..." Jeremiah 31:12

Wednesday, August 20, 2008

Creative ways to use wallpaper...

So on the Nester today I got a new idea for wallpaper... I thought you might like to see how I used wallpaper in a cabinet in my kitchen. The cabinet was all white inside and has glass front doors. I added all my "accessories" (as referred to by my husband as clutter) inside, and still there was no WOW factor. The cabinet needed something... Then I thought about adding color on the inside of the cabinet. I didn't want to use paint, so that's when I came up with the idea of using wallpaper. I went to the local wallpaper store and found the perfect pattern and color to accent my kitchen decor. I purchased one roll and I was off to start the transformation.
I've done all my own wallpapering but this was a little difficult. It was such a small area to work in. The paper had to be pieced, the patterns had to match and I covered the ceiling of the cabinet.
A few hours later it was complete. I was happy with the transformation, well sort of... The cabinet was sort of dark inside and it was hard to see all the "clutter" inside. Now, I needed my husband's help. So with a little bit of sweet talking, no really begging, I convinced him to put in some overhead lighting. I made my famous mistake of saying to him, "I have something I'd like you to do, and it won't be that difficult". That never really goes over very well with him. How would I know how difficult an electrical job would be. I underestimated the time involved. He had to rewire things. The only way to to hide the switch was put it inside the cabinet, next to the one I wanted the lights in. You can view the switch in the photo below. In the end it worked out fine. That evening once the job was completed, I made my husband's favorite dinner. That's just a helpful tip for any of you who are thinking of having your hubby do this project for you!
Now I was happy with the transformation . It was just how I had envisioned it in my mind.

Next time you're at the local home center or wallpaper store, don't just walk by the clearance section without taking a look at the rolls of clearance wallpaper. For a few dollars you can create a whole new look that will give your home, that designer look!

post signature

Monday, August 18, 2008

The Nester is looking for "mistreatments"...

One of my favorite blogs to check out is the Nesting Place. Click Here to check it out. An apron friend of mine told me about the blog and suggested I take a look at what she does with window treatments. The Nester refers to them as "mistreatments", I call it being creative. My friend knew I would be interested in what the Nester creates because I happen to have my own custom window treatment business. I love seeing her ideas and how she is able to create things inexpensively and I am sure much more quickly than I can construct a treatment. When I saw that she was having a group post about "mistreatments" I had to get in on the action. Even though I don't finish a window treatment for a client with pins and a hot glue gun it has been known to happen in my own house. How many of us have had a creative idea the day before a family get together or party. When time is running out I will be the first to plug in the glue gun to add some bling bling trim to a window treatment. I'm hoping the Nester will consider this a partial "mistreatment" and let me play along. My kitchen treatment was done just before Christmas.

With time running out and the party looming I had to break out the pins and just tie the bias tape around the horn to secure it to the pole. It's hidden in the back of the treatment. I just took this revealing photo so you could see how I accomplished this on the fly. I promised myself after the holidays I would repair my work. Well it's nine months later and as they say "out of sight out of mind". So this will be our secret!

This is my dining room and office. Well once again I was working with a time restriction. Why do we always do that to ourselves??? It must have something to do with creativity. I work best under pressure, and even better when I'm having a party. This time it was a holiday get together with a bunch of friends. They knew I had been working on the two rooms and were expecting to see a "finished product".

I didn't have any rods for the drapery panels between the two rooms. This is known as a parterre, but since I am considering this a "mistreatment" I will not give it this fancy name. I had some scarp pieces of rods, not even the same colors. I painted them with black spray paint, and brushed my favorite gold paint on them. This paint can be used for many things. View a few of my previous posts to get more ideas. After painting them I pieced them together with a mending plate and hung them on the wall by hiding some angle irons. Then I fired up my glue gun and glued on the tassel trim. Wola... a finished "mistreatment" that could pass for something right out of the drapery workroom!

Just thought I would show you the other side of the room which is my office. The cornice has some beaded tassel fringe and you guessed it....I glued it on.

In addition I recovered the wing back chair and the desk chair. This was the first time I did any type of upholstery. Believe me those chairs definitely should be classified "misupholstery"! I tore them apart and didn't mark the pattern pieces. When I got around to finishing it there was much guessing involved. I should have taken some photos with my digital camera as I took them apart. Live and Learn isn't that the saying? I guess when the client is myself, I don't think there is anything wrong with taking a few short cuts if it get the job done...
Here's the last room, my family room. Once again I used the trick of piecing the left over rods and painting them. The decorative trim is also glued on.
A view of the entire window....
Having my own drapery business and working for paying clients doesn't afford me the opportunity to do many "mistreatments". I'm always interested in ideas from the Nester. When it comes to my house and changing things around I like to get it done quickly. I can't wait to see what she comes up with next. Come and visit soon....My laundry room make over is almost complete and I have a new treatment for the window and a great idea on converting a sink cabinet into a clothes hamper.

post signature

Thursday, August 14, 2008

Handmade is always means more....

Well the list of people to send note cards to have been piling up. Birthday gift thank yous ( a bit late), congratulations on becoming a grandmother, and just general thank yous. Since I love to make handmade cards it's difficult to go to the store and buy one. One reason is that I am to thrifty (cheap). I can't justify spending $5.00 on a card. I don't mind spending that on embellishments to make the card....but not to buy the card. I have many of poems and sayings that I have saved on my computer over the years. I always keep a notebook and pen my purse. It's amazing where you can find the most wonderful sayings. So today I sat down and made these cards. Just a few pieces of scrapbooking paper, ribbon, silk flowers, gems and of course the gold paint, made these thank yous something special. A Rubber stamp embellished the inside with the word "Blessed" , which I am.

I can't wait to get these off to their destinations. I wanted to say thank you with something hand made from my heart.

post signature

Related Posts with Thumbnails