Tuesday, June 28, 2011

I'm Really Feeling Lucky!

It was a beautiful Michigan day
 and it got even better when the postman stopped his truck
 right in front of my house. 


He dropped the priority package at the front door.


The label on the side of the box says it all,
"A VERY SPECIAL DELIVERY".

You know it's gotta be something good!


I was the VERY lucky winner of a Jo Totes Camera Bag.
I had entered the giveaway HERE at

If you haven't been to the "How Does She?" website stop by
they have so many wonderful creations.

Have you ever entered a giveaway and totally forget about it?
That's what happened to me...

The bag came wrapped in this cute blue bag.
You gotta figure anything that is wrapped so cute,
has to be wonderful.

And it was!
 

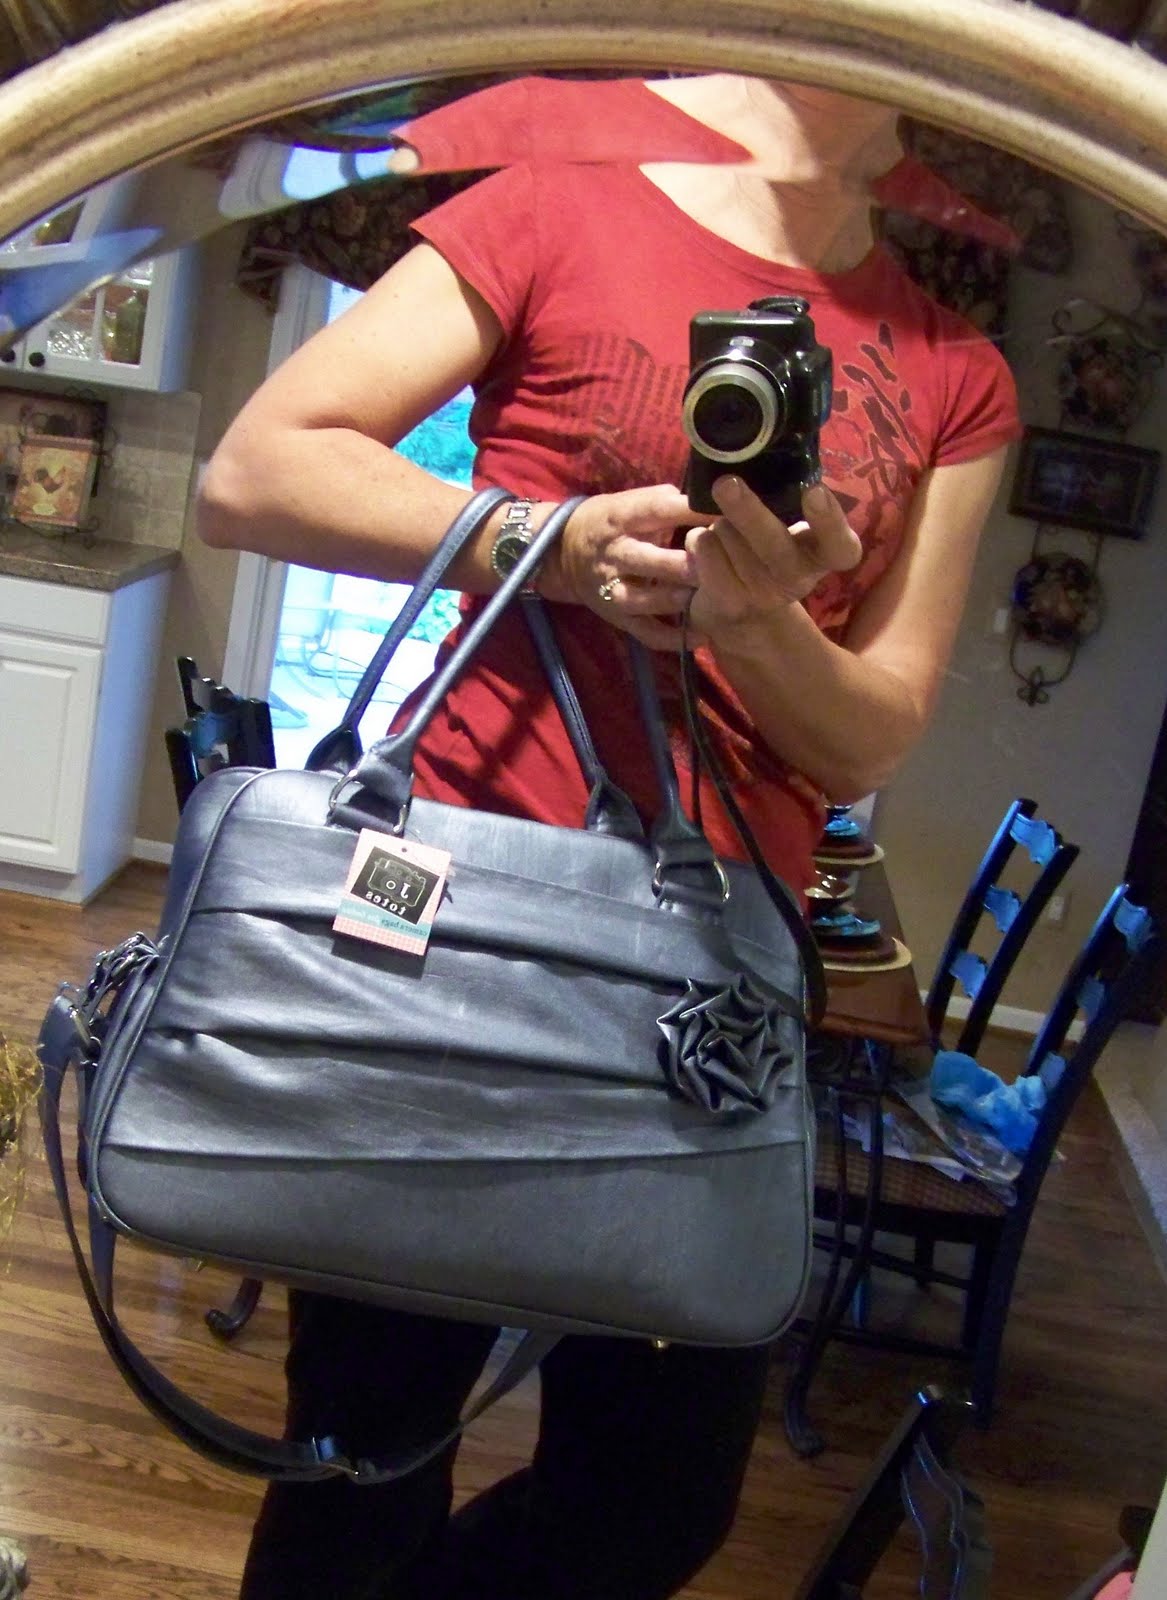
If you are looking for a stylish camera bag check out Jo Totes.

I had had my eye on one of these for myself.


I was able to select any camera bag I wanted.
I am a girly girl so the one with the rosette was perfect for me.

The bag is named "ROSE" and the color is Moonbeam.


The material for the cover is a beautiful metallic  blue color
 with a lambskin print.


Check out the rosette!


For Christmas I got a new Canon Rebel camera.
Can you believe it's still in the box!

I must admit that I am a bit intimidated by using the camera.

This new camera bag finally got me to open the box
and decide to try and use my Christmas gift!


The camera bag has padded inserts.
You can arrange your camera and all it's accessories
 inside the bag.
Everything fits perfectly.
There is plently of room inside the bag.
  You can even carry some of your personal items.

Now I am all set to start using my camera.


Carry it like a camera bag, using the sholder strap.
(took the photo with my old camera)


Or...
Carry the bag like a purse.

Isn't it so darn cute?
It's more than just a camera bag!
It has such style.
I am so excited to take my new camera bag out .

Thanks Jo Totes
and


I'll be linking up to the following sites....

Tuesday, June 21, 2011

What I REALLY Do ....

Over the past few years I have shared with you many things I have created, but I haven't showed you what I "Really Do".

What I mean, is what I do for my
"REAL JOB".

Today I thought I would share with you
 some of my custom drapery creations. 
"Creations by Sherry Lynn"
 has been my custom drapery business for about 16 years. 

 I love designing and creating things for my clients. 
 Here's what I have been up to the last few weeks....


This was a very large window. 
I added some decorative elements.
I chose to use a large tassel
to hang from the finials on the ends of the rod.


The client had a beautiful chandelier
 hanging from the center of the ceiling.


Because the window was very wide,
I shirred the cornice fabric to give it some additional texture.
I also selected a beautiful trim with crystal beads.


This window was in a master bathroom.


I choose to use a beautiful embroidered faux silk fabric.
The walls were painted a pale blue.  The clients had inherited an oriental rug which had a variety of shades of blue.


The tassel trim added the perfect touch!


In addition to the bathroom
 the clients had two identical windows in the office.
These simple empire style window treatments
were exactly what she wanted.

I love adding to trim to the drapery treatments.
I think it takes the drapes from ordinary to extra-ordinary!


These last two rooms were just installed this morning.
This window treatment was for a client who is a recent widow. 
She wanted something bright and cheery
for her living room window.


I added a striped fabric cut on the bias.  
This was the perfect coordinate for the floral fabric.


Now this last job took some work. 
The window was so large I could not fit the entire window
 into the picture. 
The bay window had FIVE sides to it!


Each cornice was made separate. 
The jabots covered where the cornices were joined together.


Here's the other end of the window. 
It was a total of 27' of cornices. 
I was nervous the entire time the installation was taking place.
One wrong measure on my part, and all the angles would be off.
The cornice had to go up in one piece. 
Because the window treatment was going right up to the ceiling, 
 all the jabots and drapery panels
were attached before we put it up.

Early this morning I had to recuit my two boys to help with the install.  This is the first time I have needed them to help.
 (I had to buy them lunch after!)

To get the cornice installed, it took my installer, myself and my two sons to hoist the cornice 9' up to the ceiling.


Once the bay was installed I let out a BIG sigh of relief.
The 4' arched cornice over the sink was a breeze to intstall!


I don't know why I haven't shared with you my drapery creations. 
If you want to see more head on over to Sharon's blog
I recently did a few rooms for her
and she was so sweet to post about them!

I'll be sharing this with the following sites.

Friday, June 17, 2011

More Graduation Boards

I've had several orders for graduation boards the past few weeks. 
This mom had LOTS of photos (almost 60) she wanted displayed.
That was a challenge, but I was up for it!

Here's was I came up with....


I have a few tips for you to make your boards extra special.

Tip #1....
I cut mats for the extra special photos. 
I want them to POP off the board
when people first look at it.
Embellished them with a ribbon and button.
It adds a special touch to the frame.


This gentleman is attending Michigan State University next year.
 His mom gave me his acceptance letter
to incorporate onto the board.

I also matted the cute baby photo...


A ribbon, button and special saying was added to the photo.


Here's tip #2...
I find most of my saying on "quotegarden.com".

Once you find a saying you like
 make a folder of different categories on your computer. 
I copy the saying and type it out using different fonts. 
Once I have it exactly how I want it, I save it to a file.
Next time I need that quote,
I just open up the file and it's ready to use.

I have folder for all different categories.
Mother, Father, Grandchildren, School, Friends, Pets, Love
 and many more....


Here's Tip #3...

This student had many awards.
Most awards are 8"x11"
 which takes up way to much room on the memory board. 
 Copy the award in color, reducing the size about 60%. 
 This works great!

Take a look at the National Honors Society Award.


It's also great for a student to get their name in the paper.
Use the same tip as the award and shrink it down.


Here's tip #4...

I double mat all my photos.
After I mat them, I distress them with metallic craft paint. 
 I use either silver or gold.
Just use a sponge and wipe it on.
This adds something special. 
 It's a bit of work to double mat the photos and add the paint
but it's well worth it!


Last tip but most IMPORTANT...

I attach all the photos to a large foam core board. 
It's extra sturdy. 
 I purchase them at Hobby Lobby. 
They carry extra large boards which can be easily cut down
with an X-ACTO blade to any size you  need.
After all my photos are matted,
 I then add small blocks of foam core
to the backs of some of the photos. 

 This helps to give the board a 3D effect.
Here's a side view...


Can you see the piece of foam core
behind the National Honor Society Award?


The young man's mom picked up the board this week. 
I had it displayed in my kitchen.
When she saw it she cried. 
 It was a good thing... 
 I knew she loved it!!!

If you are interested in making a one of a kind
graduation memory board and centerpiece
 I have a "HOW TO" video on my ETSY shop.
  Take a look HERE.
I'll be linking up to the following...

Friday, June 3, 2011

Learn to Make a Graduation Board....

It's that time of year for Graduation Parties...

Here are some Graduation Memory Boards that I have created.
They are a creation that will become something to treasure.


Mat your graduation photos
 and select some wonderful scrapbook paper. 
This will give you that one of a kind look,
 that will have everyone asking
"Where did you get this memory board"?


Ribbon, rhinestones and some paper with sparkle and bling
will add to the custom look.


Use some letter stamps
 and put a special saying on the memory board.


Add a special poem ....


Do you want to learn how to make this board?

I have a DVD with step by step directions from start to finish. 
I filmed it for my "Fancy That"  TV show.

The DVD is $11.00 plus shipping. 
Head on over to my Etsy Shop HERE... to order. 
 I also have two other DVD's for sale. 
  • Creating a custom wreath with matching door cans.
  • Creating a custom lampshade step by step.
The Graduation DVD also teaches you how to make a one of a kind centerpiece that is great for your tables for any type of celebration.

When you order the DVD I will email you the graduation saying
ready to be printed.


Here's the centerpiece... 


Just recently one of my readers ordered the Graduation DVD,
and here is what she wrote to me...

 I love the videos!  They are so clean and crisp.  
I started croping my pictures last night and matting them, today I will continue and hopefully finish by tomorrow.  I will definitely get pictures taken of the end results and of course a picture of my niece with it, so you can see it. 
Susan Escobar,   Texas. 

Do you have a boy who is graduating?
Do you know a boy who is graduating?

Here are some other examples...

This board features school photos
 from kindergarten through 12th grade.


 Why not change the photos up a bit? 
 Add photos of friends and family.


Photos done in a sepia tone with just a few colored photos...


These memory board are wonderful
to make for your  upcoming graduation party.

Do you have a graduation party to go to this summer?

This would be a wonderful gift. 
Why not make them this wonderful treasure. 
 It will be a hit at the party
 and will become a wonderful keepsake
 to display for years to come.

I'll be linking this memory board to the following sites....

Related Posts with Thumbnails