
Well it's Transformation Thursday and Do it Yourself Day, so I want to share with you may latest Do it yourself Transformation. Last week I got to spend the afternoon with a sweet friend who is a talented artist. She has blessed me with her painting talent and now I had the opportunity to return the favor. I was thrilled to do something for her. She had two buffet lamps that were beautiful, but the lampshades needed an update. Below is the lamp. While you are looking at the lamp take a look at the bookcases...Wonderful old books don't you think? NOT really... That's my friends wonderful artwork. The book cases and all the books are hand painted to look like real books. Isn't her work beautiful...

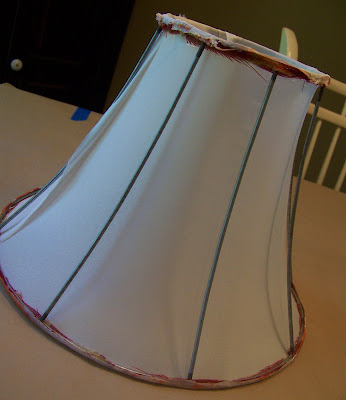
So out with the RED lampshade.... Let the transformation begin.
Let me share with you some basic steps, so that you too can change your old lampshade into a custom, one of a kind lamp with lots of glitz!

First remove all the bias tape. You can just tear it off. Be careful. If it's hard to remove steam it a bit, this will soften up the glue.
 After the bias tape is removed, carefully cut away the face fabric. You will need to use this as a pattern so take your time. Be careful not to cut the lining.
 It isn't pretty, but just wait and see.....
 Here are the fabrics I selected for the new look. I have a wonderful stash of scrap fabric from my drapery business. The trim was a find at Hobby Lobby.
 This is the entire face fabric after I cut it off the lampshade.
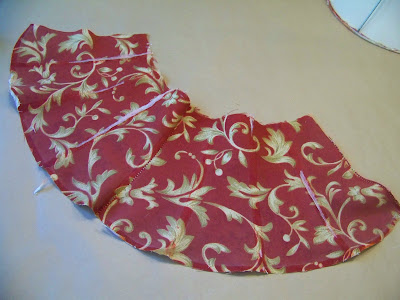 Cut one section off of the entire piece. This will be your pattern.

When cutting your new fabric, make sure you add 1/2 inch all the way around.
 This lampshade required 4 pieces of each fabric. (There were 8 sections)

 This lampshade required 4 pieces of each fabric. (There were 8 sections)

Use a HOT glue gun (not low temperature) to glue the first section on. Glue it directly to the metal ribs of the lampshade.
 Trim away excess fabric and then glue the next section of fabric in place.

 It can look quite messy at this point. Don't worry.

 Trim away excess fabric and then glue the next section of fabric in place.

Continue until you have completed the entire lamp.
 It can look quite messy at this point. Don't worry.

Next step is to add the gimp trim. Hot glue right over the seam where the two fabrics meet up.
 Keep adding trim all the way around. It's starting to look better, don't you think?


 Keep adding trim all the way around. It's starting to look better, don't you think?


Are you ready to see the finished lamp shade?
 Just add some beaded trim around the bottom and finish it off with the gimp trim. I just love how the crystals on the trim shimmer in the light!
  Here are the buffet lamps that are just little accents for the wonderful artwork that adorns my friends dining room walls. They just add a little extra sparkle....
 (click on photo to enlarge and see a closeup of the bookcases)
Do you see the cat in the bottom left bookcase?
Next time you're thinking of getting rid of that old lamp, think again. A new lampshade with some glitz and sparkle may be all it needs. If you're looking for other Thrifty ideas pop on over to Thrifty Thursdays and see what everyone is talking about.
On Friday stop by two sites that are filled with all kinds of things.
(click on photo to enlarge and see a closeup of the bookcases)
Do you see the cat in the bottom left bookcase?
Next time you're thinking of getting rid of that old lamp, think again. A new lampshade with some glitz and sparkle may be all it needs. If you're looking for other Thrifty ideas pop on over to Thrifty Thursdays and see what everyone is talking about.
On Friday stop by two sites that are filled with all kinds of things.
- It's a Beautiful Friday @ The Inspired Room
- Hooked on Fridays @ Hooked on Houses
Wishing a you day filled with happiness.


30 comments:
Excellent tutorial! I have added trim, but never changed out the fabric. It will be much more approachable now. Thank you!
GORGEOUS Sherry!!! My goodness girl, you are one talented woman! I love seeing things you make...and your friend is such a talented painter too! The new lampshades are just beautiful ~ xxoo, Dawn
thanks you so much for the How To! i hope to try this...someday.... ;)
Wow, what a transformation! Absolutely beautiful!
Hey Sherry~
These look so good! I love the 2 of them together... Great revamp!
~Whitney
I'm working on a lampshade for next week. If mine looks 1/4 as cute as yours, I'll be STOKED. TOO CUTE!!
What a fun transformation! Great job!
fabulous re-do, i'm afraid mine wouldn't look this good.
i host a goodwill party every week, stop by and link up! :)
No way!! SO in love with that lamp! Now I am eyeing mine! LOL
I host a "Room a month makeover" every Monday (Don't worry, you don't have to complete a room, a small change!) Stop by and link up!
http://theshadesofpink.blogspot.com/2009/09/room-month-is-back.html
It looks so pretty, what a great and easy makeover.
Beautiful shade! Thanks for the tutorial! I will have to try this project!
Wow. you are brave; I am not sure I'd attempt this, but the lampshades look gorgeous. Thanks for the lesson -- someday maybe I'll work up the nerve!
Cass
Love the shade and thanks for sharing how you did it. I have one that I have been wanting to redo.
Wow! Super cute! I would never even have remotely thought about attempting that! But you made it look easy!
WOW.
You have some shady skills! (sorry couldn't resist)
I am impressed with your project. I though the red was pretty but WOW! The finished product was great.
THANK YOU!!! I acquired some lamps from an auction and their shades need a makeover. Did not want attempt sewing.
Thanks for sharing!
Living it up at Lakewood,
Cindy
Fabulous tutorial.....you are one talented lady thanks for sharing...Pat H
When you first started to rip off those pretty red shades, I gasped. I do have to admit that the transformation is lovely. I like that it has the beaded trim on the bottom.
Thanks for the great tutorial. Your steps really broke it down to the basics (and that's what I need). I'm inspired to give this a try. Thanks.
Jane
The shades look fabulous! Good job. xo
Thanks for the easy to follow tutorial. Fabulous lampshades. Your friend is a very talented artist.
Wowza! I love that! Great step by step..and the cat! What a cute surprise! Thanks for linking to Thirfty Thursday this week! I always enjoy making the rounds to see the treasures that you find! I appreciate your visits to Bloggeritaville, friend! Thanks for your participation!
Leigh
Tales from Bloggeritaville
www.lbratina.blogspot.com
Great tutorial! I have a few shades that I need to try this on!
blessings
mary
Thanks for the great tutorial! I have bookmarked it for future reference. Love the trompe l'oeil bookcases ... you have a VERY talented friend!
I absolutely adore your blog. I found it through Hooked on Houses, and I'm bookmarking it. I'm going to go poke around some more!
WOW... GREAT transformation!!!
Preciosa transformación , increíble cambio de tu lámpara. Chany.-
Preciosa transformación , increíble cambio de tu lámpara. Chany.-
I am the lucky gal whose lampshades were transformed magically by Sherry's talented hands. She changed another pair of lamps for me, too. Oh how beautful they are!
Each time I turn on a lamp, I smile as I think of my very generous friend. Everything Sherry touches becomes special because of the outpouring of love she gives to the most mundane things. I am humbled by her spirit of giving, and inspired by her energy and creativity.
What a great tutorial thanks so much. Your lamp is lovely.
Post a Comment