Thursday, December 31, 2009

"A Year in Review" Party....

Everyone loves a New Years Eve Party!
Stop by "My Romantic Home" there's a party going on.  It's the best  2009 pictures for some wonderful blogs.  Here's what I wanted to share with you... Some of my "Creations From the Heart"...


(click on photo to enlarge)

  When reviewing all my past posts and photos from this year, I decided to include two photos of moments that were very dear to my heart.  The first photo, of my oldest son's graduation and the second of my youngest son's first day of high school.  These are two memories from 2009 that will always be tucked away in my heart.  It's hard to believe that 2009 has slipped away.  I look forward to a New Year and await anxiously to see what God  has in store for this New Year. 


Wishing you a very Happy New Year which brings
 Peace, Love and Happiness.


Tuesday, December 29, 2009

A Traditional Red & Green Staircase

After sharing with you my last post that had a staircase all decked out it a Winter Wonderland of WHITE, I thought I would share with you another client's staircase decorated in traditional Chiristmas colors of Red & Green.  I myself have always been a "Traditional" Red &Green gal, but I sure did love the sparkling White  decorations I shared with you.
Well here is the staircase when I arrived to decorate.  This picture is only a small section of it.  It was very large and it took me 8 hours to complete the entire thing!


As you can see from this photo the railings are on both sides meaning double the decorations!


I am going to take you step by step, on how I decorated the staircase.
I found these nifty things at the garden center.  I used them to attach the artificial garland to the railings.  They worked great because you could adjust them and they did not mark up the wood handrail.


Here's a photo of how I attached it.


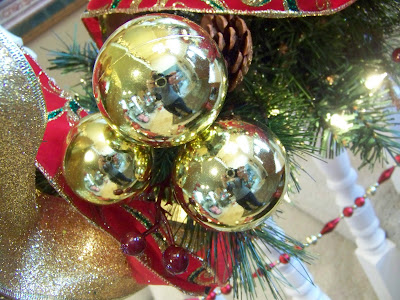
I purchased the garland at Costco.  It was $19.99 for 9 feet and it had the lights and pinecones in it.  I was very happy with the quality.


Next step is to attached the beaded garland.  Michaels always has a good selection and they also come in 9 foot lengths.


(click on photos to enlarge)


I made some bows using two different wide wire edged ribbons.  One was a gold glitter and the other was  red velvet with a green and gold design.  I attached a bow at the beginning and end of each garland swag.


I found these beautiful poinsettias at Hobby Lobby for half off.  I used about 35 of them and also add the gold glittered berry picks.


The next step is to add some gold ornaments.  When working on a staircase, I like to use the plastic ball ornaments.  Then when they fall you don't have a mess to clean up.  Many of the retilers carry them. I found them at Garden Ridge.


Adding two different ribbons throughout the swaged garland added some extra punch. I wrapped it around the greenery. This takes a bit of work but it adds a nice touch.


I think at Christmas you can never have enough GLITTER.  I decided to add these gold glitter picks so that everything sparkled a little bit more!


Now it's time to step back and admire your work. 


It's the perfect time right now to stock up on some  sale items so that next year you can follow these steps and have a one of a kind staircase that twinkles!


In the evening when the lights are low, the garland sparkles when the tiny lights glow against all the glitter.


I enjoy decorating, but most of all I enjoy the seeing the end results.  There is such  magic that takes place, when all the lights in the house are turned off and the only light radiating is from the small twinkle lights that come from the Christmas decorations.  It's the only time of year, for just that moment you can truly remember what it was like to be a child during the holidays.   Wishing you a  week filled with many wonderful holiday moments to treasure!


Sunday, December 27, 2009

A Winterland of Stairs...


Now that all the business of shopping and decorating has slowed down and I am getting to just enjoy the Christmas holiday I wanted to share with you some of the decorating I did over the past month.  I  had promised to continue sharing with you more of the Christmas decorations I have been doing for customers. I hope you enjoyed my previous post  HERE using a white & and gold color theme. If you did, you will enjoy seeing what I have to share with you next. The staircase reminds me of a beautiful Winter Wonderland. I love to have my staircase decorated for the holidays. It’s one of my favorite decorations in my house. This may sound silly, but that is one of the reasons I like living in a two story house. I don’t exactly like doing the decorating of the staircase, but I love how it twinkles when it is done. It’s a lot of work, especially when you are up at the top of the staircase. Well let’s get to the photos.
Here’s the before photo. A beautiful staircase without any decorations….


Now let’s add some GLITTER, BLING and
 CHRISTMAS AMBIANCE….


(Click on photos to enlarge and see the detail)


The silk poinsettias were a shimmy silver and gold with a hint of glitter which added just the right amount of sparkle. When decorating your staircase think about adding some type of filler. I incorporated these gold glitter picks with the small crystal balls. I really liked how they looked.


I used some of the same ribbon that I used on the Christmas tree that I shared with you in my previous.  The Gold glitter ribbon was quite messy to use but was well worth it, and the white and gold snowflake ribbon was a perfect
 “Winter Wonderland Look”.


At the beginning of each swag I made large bows using both styles of ribbon.


I strung a single strand of large gold beads that hung right under the green garland. When the lights are turned down the staircase has a wonderful GLOW to it.


If you haven’t tried using the plastic bulbs you should. They work great when wiring them into the staircase garland. Have you ever had a glass ornament come loose from the metal cap and break all over the floor? This will never happen if you use the plastic bulbs. You really cannot tell the difference. I like the look of the satin and shiny gold bulbs mixed together.


At the bottom of the staircase I continued the garland down the last rung and finished it off with a bow at the top and bottom. I always put lights in the garland. It takes a bit of work to figure out where to run all the extension cords, but it is well worth it.  Here’s a tip Buy extension cords in colors that you can easily hide. If you have light colored carpeting and moldings, purchase white or ivory colored extension cords. If your moldings are dark, pick up brown extension cords. You will achieve a more professional look, if you can’t see all the cords dangling from everywhere.


It’s hard to believe that Christmas is already here. Is it just me, or do you see the years slipping by much quicker as you get older? I would love to hear from you. Are you still a Gold & Red themed girl or have a convinced you to try a bit of White & Gold decorating next year?  Whatever your Christmas color theme is, it doesn’t matter as long as it is a Creation From Your Heart".
Stop by Metamorphosis Monday and  Do It Yourself Day to take a peek at some wonderful decorating ideas.

Wishing you and your familiy a wonderful Christmas Season....


Monday, December 21, 2009

Holiday Open House...(part two)

I'm back with the second part of my holiday tour. I have the decorating done, but the shopping isn't started. Not much to do this year. As I told you in a prior post, this year we are cutting back, like a lot of Americans. We're cutting back, but it doesn't change Christmas or the meaning of Christmas. This year has brought many changes for our families finances, but we have been blessed in many ways. Sometimes I need to be reminded of that.  sometimes we forget the many blessings God has showered upon us. During this season, with so many people struggling,  give thanks to God for your many blessings....

Now, grab a cup of coffee and enjoy the rest of the decorations from my house ....


The wreath is the same this year. I made the wreath. I taught a few classes this year on wreath making . Here's a tip for you... use and artificial wreath and once it's decorated, stick in some fresh greens. Your guests will think you have a real wreath on the front door. Once the season is over, remove the greens and replace the wreath next year with fresh greens.

 
I lit the fire for the first time and I had to show you a photo. Nothing says ,"Winter is here" than a cozy fire burning bright!


I added some Christmas decorations to the corner bakers rack in my kitchen. If there is a surface during the holiday, I will add a decoration to it!


I have lots and lots of family photos around my house. I've been told it isn't "PROPER" to have family photos out in the general areas of your home. NOT FOR ME....I DON'T CARE. I love my family and I love having photos, and lots of them. Here's a photo of the boys and their dad. Now my oldest son is 6'3" just like his dad and the youngest is 6'. They sure have grown since this photo. That's why I love having the photos. Photos bring back so many wonderful memories. The one with the children is a photo of me with my sisters and brother. I think I was 7 in the photo. The last photo is of my husband and I. I still think he is a cutie!!!
  
Brought out my santa plate. Just by adding some greens, berry picks, ribbon and poinsettias you can add some Christmas spirit to just about anything.
 

I had to leave my rooster out. I love roosters!


I always add Christmas decorations to my tables. Here's the hall table.
 
I added a strand of crystals to Santa's beard. Doesn't he look festive.


Oh here's another photo. More recent...It's our family photos from Christmas last year. More crystals were added to the candles.

 
The foyer table has Good Old Saint Nick! I added lights so there is a nice glow when the lights are low in the evening. Can't get away without another photo...This one, of my husband as a child with his family.


Here's a quick and easy Christmas accessory to make. I used and old book and tied some Christmas ribbon around the book. Add a bow and a glittered poinsettia. It's that easy. Oh another photo...This one is of some dear friends on New Years Eve.


I wasn't kidding when I said I have a lot of photos. My husband as a baby with his grandparents and a photo of his great grandparents in Russia years ago.


I added some green, berries and lights to the mirror. I love how you can see the reflection of the Christmas tree in the mirror. It's like having two trees in one room! Oh look at that...MORE photos.


The kitchen light is embellished with some greens and red Christmas ornaments hanging from wide ribbon.


The dining room is ready for Christmas dinner. I Made an arrangement for the table and added an arrangement on top of the china cabinet.


For some extra sparkle, I added some glass ornaments with different sizes and shapes and hung them from the chandelier.

 
The prism stars glisten and remind me of the first Christmas!


I hope you have enjoyed looking at my home dressed up for Christmas. It's my favortie time of year. Not just because of all the holiday decorations, but because of the true meaning of CHRISTmas. Chistmas for me, means love... The love my savior has for me and for you that he would send His son to be born in a manger. Christmas also means family and sharing the love with those special people in your life. I wish each and every one of you a blessed Christmas and a wonderful New Year.
 May Peace be your gift at Christmas and your blessing all year through!


Related Posts with Thumbnails