Thursday, November 25, 2010

Cabinet Re-Do

Thanksgiving is one time of year when it's important to
 reflect on those things we are thankful for.

For me,  Family and Friends are two things
 that are true blessings in my life. 
 I have some wonderful friends in my life. 
 Friends who are selfless and always willing to help.

My friend Sharon truly gifted me with sharing her talents a few weeks ago.  Sharon is a wonderful decorative painter. 
 Take a look at her work HERE.

Here's how she blessed me...

I have never been happy
 with these white cabinets in my great room. 
 The color (or lack of) just didn't blend with the decor of the room.


Here's a view of the room....
The coffee table is a distressed black
with a very sheer gold rubbed on the edges.


So BINGO!
I had an idea. 
 Why not paint the cabinet black. 
I painted a spare drawer front, just to see what it would look like. 
I liked it.


I spoke with Sharon, getting her professional opinion. 
 She didn't think twice and volunteered her talents
to help do it completely by herself.

Boy was I excited. 
I couldn't remove the cabinet doors
 and tape off everything fast enough.


Here's Sharon hard at work. 
 She worked and I just talked non stop.
We decided to keep the inside of the cabinet white.  
The black would have been to dark inside.


Here's the beginning stages. 
 I think all the liquor in the cabinet was left over from our wedding 22 years ago!


 Ready for the transformation?

I just love it!


I added some knobs that are an oil rubbed bronze color.


I got a pieced of decorative molding to use as a baseboard. 
I was worried about getting black paint on the carpet. 
So Sharon painted the molding first
then we put it in place along the bottom of the cabinet. 
I thought this would dress up the cabinet. 


Here's a view from a different angle of the room. 

 Doesn't the cabinet look nice with the coffee table?


This was the perfect look for the room.
Every time I look at the cabinet I will think of my friend
who blessed me with the gift of her time and talents.

Wishing each of you a very blessed Thanksgiving.
I'll be linking up to the following blogs...


Thursday, November 18, 2010

Thanksgiving Hostess Gift...

Looking for a Hostess gift for Thanksgiving?

This also makes a wonderful Christmas gift...

This easy project makes a wonderful gift
and you may also want to make one for yourself.
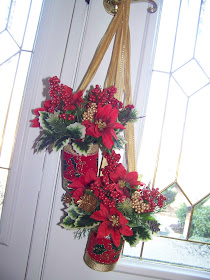
This can add a lot of punch to your front door decorations....


The supply list is simple.
  • Two large soup cans 18oz. cleaned and rinsed.
  • Assorted sizes of ribbon
  • Four large buttons
  • Silk fall flowers
  • One Block of Styrofoam 

Easy Instructions

1.  Hot glue assorted ribbons around center, top and bottom of can.

2.  Cut Styrofoam and insert into cans.

3.  Insert a small silk floral bush into Styrofoam.
(or arrange individual flowers into can)

4.  Cut two lengths of 2" ribbon, 42" and 28" inches. 
(You will use this to hang the cans from the door knob)

5. Hot glue one end of the 42" ribbon to the can 1" from the top edge.  Glue the opposite end of the ribbon to the opposite side of the can 1" from the top edge.

6.  Repeat step 5 using 28" ribbon on the second can.

7.  Glue the buttons on top of the ribbon where it was where it was glued to the can.


Using different ribbons and flowers will change the look...


Looking for some quick Christmas gifts for a teacher,
 hairdresser or hostess gift? 

 Take a look at these door cans...


Next spring
 think about making some pretty cans for your front door.


Crafting a one of a kind item dosen't have to take a lot of time or be expensive.  Just follow these simple instructions and you will have a gift  for the holiday season.

I'll be linking up to these sites....


Wednesday, November 10, 2010

Creating a Custom Framed Picture....

With the Holidays fast approaching
do you find yourself packing more "stuff"
 to do into each day?

This is my fovorite time of year, but with that comes
so many more things to add to your calander.
It's a great time to remember to just take a minute
 to enjoy the season.  If only I could remember that!

In my previous post, I said I would share with you how to take an ordinary piture and make it look like it was custom framed. 
  That's exactly what I did in my Powder room makeover.
  I found this picture at Marshalls Home Goods.  It was on the clearance rack. Yhippiee! The frame was broke, but I didn't need it.
It was the print behind the glass that caught my eye.


Don't you just love a good bargin?


Next stop Kinko's.
  I removed the print from the frame. 
 I'm sure the old frame will come in handy for another project. 
 At Kinko's I enlarged the print on the color copier. 
  It took a few tries, but I was  able to size it for the new matting.


 The botanical prints shown below hung in my foyer, until recently when they were replaced by some photos we had taken of my sons. 
 I had  recently sold these prints in a garage sale. 

What was I thinking?

 I should know by now
that eventually I would have a need for them. 

 Well, fortunately for me I knew who the new owner was.  It was a friend who is a decorator, and she had bought the prints only for the frame.  I quickly gave her a call, and asked begged
if I could have the mats from the photos. 


With a little bit of bargaining they were back in my hands.
The matting was the PERFECT color for my new bathroom.  If I had to purchase a custom mat with a fillet,
 it would have cost a small fortune.


Next step.... 
  I embellished the print with some amber colored swarovski crystals.  I purchased them at Michaels.  HERE'S what they look like. With my coupon they were less than $4.00.  I had seen this idea at an up scale home decor shop.  The 14"x14" framed picture was $180.00 and WAY out of my budget!


In this photo it's had to see how much the crystals SPARKLE!When I purchased the crystals, I also got a plain black mat that was smaller than the green mat.  I wanted to give the print a custom look so I double matted the print.  Lucky me, Micheals was having 50% off all open back frames.  In addition there was a coupon in their flyer for an extra 20%  off all framing.
 That made my day!


I added the fillet between the two mats. 
The matting matched the wallpaper perfectly.


 Final Cost: $45.90
Frame $20.00
Black Mat $2.50
Crystals $4.00
Kinko's 40 cents
Marshalls Print in Frame $11.00
Bargining with my friend to buy the mat back  $8.00

*I could have saved $20.00 by using the old frame,
but the new one looks so much better!

I'll be linking this custom framing tip to the following sites:


Monday, November 1, 2010

Powder Room makeover

Last week I promised I would share with you
 the bathroom makeover. 

We recently had  to have the wood floors refinished.  When we returned from a family vacation, we were greeted by water on the wood floor.  The  refrigerator had stopped working and everything had defrosted inside the fridge, including all the ice inside the freezer.  Never, did I think this would cause a bathroom re-do. 

 Well...  the toilet and pedestal sink in the bathroom sat on part of the wood floor, so they both had to be removed
 before the floors could be sanded.
When the contractor removed the pedestal sink it tore the wallpaper, so the makeover began....

Come on in and see the finished room...


My sweet friend Shelly made me this beautiful frame. 
 I loved it, but didn't have a spot on the wall to hang it.
I decided to hang the frame on the bathroom door. 
 I attached a decorative ribbon to the back of the frame.
 I then stapled the ribbon to the top edge of the door .


It's the perfect spot!


Love the bible verse....


Here's the new wallpaper.


I wish I had a photo of what this cabinet looked like in
 it's "Previous Life".
It was a bargain in the clearance section at TJ Max.  It had a monkey with a palm tree  painted on it.  When I brought it home my family thought I had  lost my mind, but I had a plan!


I left the top alone. 
 As for everything else, it got a coat of green paint,
some glaze and then a coat of sheer metallic paint.
I love adding tassels to drawer pulls!


I added some wood decals
 that I picked up at the local hardware store. 
 I just used some wood glue to attach them
and then painted over the entire cabinet.


Why not think about adding a tassel, decorative trim 
and some beaded trim to embellish a lamp?


 A few photos of my boys sit on top of the cabinet.


An old book that I just wrapped in some black paper and then added a strip of printed scrapbooking paper.  I just embellished the book by brushing it with some gold paint. 
 Two little bunnies sit on top of the book.


We decided to replace the pedestal sink.  There was no storage in the bathroom and I found this cabinet that remined me of a piece of furniture.  When I spotted it I knew it would be perfect!


I love adding candles in the bathroom.  I'm not a fan of seeing the label on the candle.  Check out my post HERE about giving candles a quick "one of a kind" look.


The hardware, lighting and mirror
were all part of the previous bathroom.
Can you see the hooks on the back of the door?


I really did not want to put up a towel bar
 in the small powder room.
 I decided to hang the hook for the hand towel.


I found it at Marshals Home Goods. 
One of my favorite stores for home accessories.


I didn't want a blind in the bathroom, but need privacy.
 Whoever designed the house, was definitely not thinking.  They place the toilet right in front of the window.  I decided to use two tension rods and gather on sheer fabric for privacy. 
I made a soft shade for the valance.


Some beaded trim was added to the edge of the valance.


This framed picture worked out perfect for this room. 
It did not start out looking like this.  Stop back later this week and I'll show you how I transformed a clearance item
 into this custom look.


Hope you enjoyed seeing the makeover.
  Thanks for stopping by. 
 I'll be linking up to the following sites....