Sunday, October 25, 2009

My Office Transformation...

A few weeks ago I posted some photos of my new work space HERE. So many of you took the time to comment about my "small space" transformation. The computer armoire got a new face lift, and some of you wanted to know what the rest of my office looks like, so here it is.
Well, not really...
This photo is the original office. When we originally moved in, we moved my husband's "MAN DESK" into the room. Well that didn't work out very well. The office is right off the foyer and does not have ANY doors. He likes to leave all his work laying out on the desk. Because it's the first room you see as you enter our house, I like the room to have that "Not so lived in look". I'm more the decorator, not very practical at times. So his office moved up to the unused forth bedroom.
I knew I wanted the room to have some color that picked up on the rest of the colors I used in the house. It also had to have a bit of BLING & GLAM.
The room already had the dental crown molding. I decided to paint the walls a brick red color and the ceiling color a gold tone. Adding a ceiling color really draws attention to the crown molding. My decorator friend Ann, suggested that I hang the four mirrors on the wall . I found the frames at Michaels, when they were half off and I inserted some pre-cut mirrors. The mirrors reflect the lamp on the top of the armoire and the lamp that Ann found for the desk. She knew it was perfect for me. It has crystals on it. Which I LOVE.
Here's the view from my desk. It helps that I have a custom window treatment business. I designed and made the window treatment. The drapery panels have are pulled back with this tassel. A great find at Home Goods Store. Another close-up.... I love using drapery trims and when it has beads it all the better! This chair was a thrift store find about 18 years ago. I had bought it for $50.00 with the good intention of taking an upholstery class and recovering it. Originally it was an aqua blue velvet. Just recently I decided to tackle the project on my own. I was happy with the finished chair. I don't know if I will every do it again. It was a lot of work! A view looking out into the room. Here's my new computer amoire makeover. I am really pleased with this new small space. 
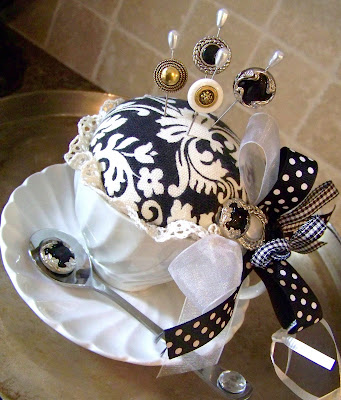
Small little details that finish off the top of the armoire. One of my favorite things to accessorise with, are lamps. I usually wind up embellishing the shades. A beaded trim adds just a bit of GLAM. My desk is just the perfect size for me. It is one of my favorite things in the office. The mirrors do a great job of reflecting all the light. Here's the detail on the legs of the desk. The desk chair came with an off white fabric. I spotted this fabric and decide that I would tackle recovering the chair. This one was much easier that the other chair. The lamp shines down upon a family photo that sits on the desk.
Each year we take a Christmas photo, which I proudly display on my desk.
Can a girl ever have to many crystal bobbles?
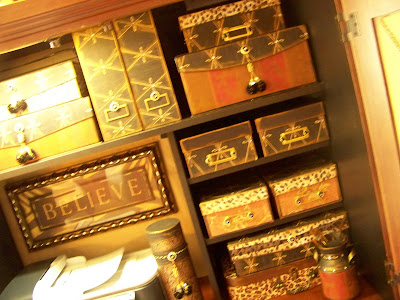
My very favorite piece in the room is this cabinet. Originally I got it from the "Naked Furniture Shop". It's a store that carries unfinished oak furniture. My good friend and faux painter extraordinaire Sharon, helped me to bring it life!
This is a view into the dining room, which is connected to my office. Originally my office was meant to be a formal living room. Well, we are not that formal around here. A formal living room would have just been an unused room. I made these drapery panels to separate the two rooms. This style of drapery is call a parterre.
Here's a close-up of the wonderful free hand art work that Sharon did....
When I bought this print, I didn't know exactly where to hang it on the wall. I rested it on the cabinet trying to decide, and it's been there ever since. Who said you had to hand a picture directly to the wall?
This was one of my dollar store frames that I embellished and printed out some words. It's important to remember to praise HIM under all circumstances. I need to remember that more often!
This beaded garland has to be one of my favorite things to use. I have it on candlesticks, lamps and chandeliers.
The beads add that extra Sparkle!
These photos are some of my treasures. The one photo is a picture of my husband with his grandparents. The middle photo is of his great-grandparents in Russia, and the smallest photo is his other grandparents.
I hope you enjoyed the tour of my office remodel. When you are planning your decorating remember to surround yourself with things that make your heart smile. What more creative inspiration? Stop by these links...
Wishing you a week filled with happiness.

Monday, October 19, 2009

It looks like Autumn...

As you can see, this past week there were no signs of Autumn at my house. For some reason, I am running behind this year. It always seems as if there is something more important that needs to get done. I finally got the Fall decor out of storage and decided to decorate.
Now, the decorations are up and it feels like Fall. It took awhile to motivate, but once I got started I really enjoyed myself. I added the lights in with all the decorations and I just love the way it twinkles in the evening.
The banner was a wonderful unexpected gift from a friend and it's one of my favorite things to put out. Sometimes I need a slight reminder to "GIVE THANKS" in all circumstances. This is a great reminder for me.
The mirror hanging over the piano, got a little embellishment....
A simple grapevine wreath with berries was just what the mirror needed. I found this wreath up in the attic. I had used awhile back and decided to bring it out of storage. I added a pretty ribbon to attach it to the mirror. Here's an easy trick to hang a wreath using ribbon. Loop the ribbon through the wreath, cut the ribbon the proper length and use a thumb tack in the top of the mirror to attach the ribbon to the top of the mirror. This also works GREAT when hanging a wreath on a door. I want to share with you my ceiling fan. I really don't care for ceiling fans. My husband likes them for the practical purpose it serves. I have never found them all that attractive. When I was decorating the room I wanted a warm, traditional look. I had in mind a chandelier. There was no convincing my husband. If it didn't have a fan attached to the chandelier, it wasn't going to happen. Well, look at this.... It had wonderful crystals, and silk lampshades. Take a better look at it HERE I was so excited when my friend Ann (who is an interior designer) found this for me. It was PERFECT. Just the look I wanted and it made my husband happy also! I finished the inside decorations with the foyer. The entry table is adorned with gilded pumpkins and my favorite beaded garland. The pumpkins have been around for years, I just added some gold paint to them to give them a bit of Bling. The black candlestick, didn't look that way in the beginning. It was a flea market find that was quite an ugly color. Some black spray paint and a bit of gold paint gave it a whole new look. Just enough Fall decor to greet the guests who enter. This is an easy project. Last week I taught a class on how to make these door hangers. The class was a wonderful group of women who were thrilled to have completed these by the end of the evening. I have two different sets of Autumn door cans. One set, hangs on the outside of the front door to greet my guests when they arrive. the other set hangs inside so that I can enjoy them each time I pass by the front door.
If you love to see new and creative things, stop by A Soft Place to Land. It's DIY day. Here's a few other links I'll be posting to...
I'm sure you'll be inspired. Wishing you a Wonderful Autumn Day.

Tuesday, October 13, 2009

A White Teacup and Saucer....

I've been busy at work stocking up for an upcoming show in November. I have some of my "Transformed" Teacup & Saucers ready to go. Let me share with you...
I had a customer who called last week and needed a quick gift. It had to be Black & white and she was a seamstress. So this pincushion worked out perfect! I found these cute little spoons so I decided to add them to the pincushions. I just embellished it with a button and rhinestone. Can't forget the BLING.
I love to add the buttons to the pins. I think it goes so well with the sewing theme.
Added my little tag and the gift was ready.
Presentation is very important to me. Those of you who are crafters know exactly what I'm talking about. Just simply wrapping the gift in clear cellophane would not do. I love to add all the extras... A big satin bow and some iridescent shred and it's ready to be shipped off. Next time you run across a single teacup and saucer at the thrift store think about the possibilities. Looking for more inspiration? I'll be linking this post to some wonderful blogs. Come take a peek. Wishing you a day filled with joy and happiness.

Thursday, October 8, 2009

My New Place to Create.....

It's "Do It Yourself Day", so here's my latest project. If you're a crafter, you know how much "STUFF", I mean supplies, you can accumulate. I have it packed in every extra drawer. I had plans of taking over my oldest son's room when he left for college. Well my plans are on hold. He received a scholarship to a college in the area and will be living at home for another year. So that file labeled " CRAFT ROOM IDEAS" has been set aside. You know the file, the one with all the wonderful ideas....The chandelier in the center of the room, the big desk to work on, the beautiful memo board to display creative ideas and all the accessories that finish off any dream craft room. I have a vision in my mind. So for now, I'm just going to transform my little corner of the house to hold all my "STUFF". I have a computer armoire that no longer holds the computer. I now have a laptop computer so all I have in it is the printer. There was extra space, so I claimed it , and then transformed it. Here's what I started with....
Here is how the transformation began..
I really didn't like the big black area behind the printer. I knew I wasn't finished. What to do?
I decided to cover a piece of foamcore board with some silk fabric I had in my "stash". It was the perfect color. I just measured the size, cut the foamcore and hot glued the fabric to the back of the board. Then I stuck it behind the printer. It still need something....
I knew that Hobby Lobby gift certificate I got for my birthday would come in handy. Oh ya, and it has a leapord print to boot! I had to hang the frame when my hubby wasn't home. If he heard the hammer pounding he would have asked, "What are you doing NOW?" Then I would have had to tell him that I was pounding a nail into the computer cabinet. I don't think that would have went over very well. So while he was on a trip to Home Depot, I quickly hung the frame. Isn't it just perfect.
Now for the doors of the cabinet....
I made a template by taking newspaper and tracing the shape of the opening. I transferred that onto a thin 1/4" sheet of plywood and cut out the shape with my jig saw. No help from my husband, I love using power tools. After the cutting was complete, I wrapped the board with batting and some of the same silk I used earlier. I added some decorative gimp and covered buttons in the silk.
I tried heavy duty velcro to attach the boards, but it would not hold. So I had a good idea, so I thought.... I would screw the board right into the door. I decided to do this under where two of the buttons were, so that you wouldn't see the screws. I found screws that were not to long so that they would go through the entire door and puncture the front of the door. Everything worked out great until the last screw was going in. I pushed a bit to hard when I was using the power drill, and I heard a crack. The screw went right through the front of the cabinet, cracking the wood. Now this would not go over real well at home. I quickly searched for the business card I had saved for the furniture repair man. Years ago we had some furniture delivered and there was a slight problem. The furniture store sent someone out to fix it. He had done a wonderful job, so I asked for a card and boy was I happy I had it in my business card file. He came out the same day, and it looks like new. Here's some close-ups.... 
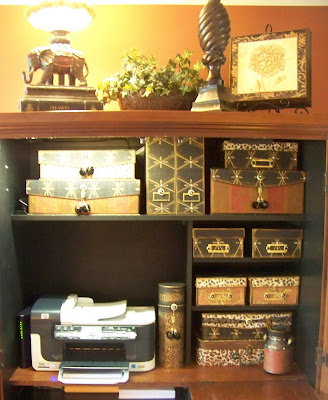
I still need to label the boxes so I can find the items when I need them. I'll share with you what I used for my transformation. Some wallpaper and scrapbooking paper... My favorite gold craft paint. I use this for everything I want to "Glitz UP". The glue adhesive I used. I like this much better than Mod Podge. It's thicker but more expensive. You can get it at Joann Fabrics. Don't forget to use your coupon! I purchased ordinary photo storage boxes from Joann Fabrics. They were on sale 2/$5.00. I bought them in black. I cut the paper to fit the sides and top of the box.
Covered the back of the paper with the adhesive gel.
Added the gold paint to the edges with a sponge.
And more gold paint detail. Can you ever have enough gold gram?
I also found other types of storage boxes marked on clearance at Michaels. They were 80% off!
Added some "Bling" with rhinestones and then found some cute tassels at Hobby Lobby. There were two on one cord, so I cut them apart...
and finished the tassel off with a button and rhinestone. Did I mention how much I love using rhinestones?
Some sheer black ribbon and more buttons embellished this box.
Before and After the rhinestone was added.
More Rhinestones....
A cute little can and a container used to hold wine are now my paint brush and knitting needle storage containers.
Just covered with decorative papers.....
More buttons and rhinestones.
Added some little frames and old photos from our childhood....
This was a photo when I was 10 on Easter morning with my mom and sisters.
I'm in the middle. We always had matching bonnets and capes to wear on Easter.
A pretty wired ribbon and button were used to hang the photos on the memo board. Another Easter photo with my younger sister. I was 5 in this photo.
A close up of the memo board...
The gimp and buttons....
Some treasures I gathered from around the house and used for the top of the cabinet.
Couldn't leave this lampshade just looking like a "Plain Jane". It was crying out for some beads and decorative trims.
The work space isn't as large as I would like it to be, but I love the look and it makes me smile when I am working on a project. Stop back later this week to see the rest of my office. I'd love to share it with you. Do you have a small space you can personalize and make your own? Take a look around your house. Maybe there is just the spot to make your heart sing while you are creating. Stop by Shabby Cottage Studios . Gail was so sweet to post about my purse in the Haute Handbag Magizine that hit the news stands on Oct. 1st. Look at all these interesting places to visit this week. I'll be linking this post to....
"I made it without my Hubby Party" @ Shanty2Chic

Thrifty Thursday

Transformation Thursday

Hooked On Fridays

Metaorphosis Monday

Related Posts with Thumbnails